Step-by-Step Guide: Setting Up Docker for Your Rails Application on Ubuntu
In this tutorial, we will demonstrate how to dockerize your Rails application for local development. This practice can prove highly beneficial right from the beginning of your new project, helping to circumvent issues where new team members might otherwise spend valuable time setting up the Rails app locally, including the installation of dependencies and similar tasks.
Step 1: Install Docker and Docker Compose
First, we need to install Docker and Docker Compose. Docker is the platform that allows you to run applications in isolated containers, while Docker Compose simplifies the process of managing multi-container applications. To install them, use the following commands:
sudo snap install docker
sudo apt install docker-compose
Step 2: Grant User Permissions
By default, Docker commands require root privileges, which can be inconvenient. To run Docker commands as a regular user, add your user to the docker group:
sudo usermod -aG docker $USERStep 3: Apply Group Changes
To apply the group changes without needing to log out and log back in, use the following command:
newgrp dockerStep 4: Create a file named docker-compose.yml in your project directory.
version: "2"
volumes:
  db-data:
    external: false
services:
  db:
    env_file: .env
    image: postgres:12.15
    volumes:
      - db-data:/usr/local/pgsql/data
  app:
    env_file: .env
    build: .
    volumes:
      - .:/usr/src/app
    ports:
      - ${SERVER_PORT}:${SERVER_PORT}
    depends_on:
      - db
A docker-compose.yml file is used to define and configure multiple services, along with their settings and dependencies, in a single YAML file. It simplifies the management of multi-container applications by allowing you to define the relationships between services, environment variables, ports, volumes, and more.
version: "2": Specifies the version of the Docker Compose configuration file format being used.volumes:: Volumes are used to store and manage data that needs to persist beyond the lifecycle of a single container.db-data:: Defines a named volume named “db-data.”external: false: Specifies that the named volume “db-data” should not be external, i.e., managed by Docker Compose.services:: Services allow you to define how individual containers interact, communicate, and work together to create a complete application stack.db:: Defines a service named “db.”env_file: .env: Loads environment variables from the.envfile for the “db” service.image: postgres:12.15: Specifies that the “db” service should use the PostgreSQL image version 12.15.volumes:: Specifies volume mappings for the “db” service.- db-data:/usr/local/pgsql/data: Maps the named volume “db-data” to the/usr/local/pgsql/datadirectory within the container.app:: Defines a service named “app.”env_file: .env: Loads environment variables from the.envfile for the “app” service.build: .: Builds the Docker image for the “app” service using the current directory as the build context.volumes:: Specifies volume mappings for the “app” service.- .:/usr/src/app: Maps the current directory (where the Dockerfile is located) to the/usr/src/appdirectory within the container.ports:: Specifies port mappings for the “app” service.- ${SERVER_PORT}:${SERVER_PORT}: Maps the host’s port (defined by theSERVER_PORTenvironment variable) to the container’s port (same value).depends_on:: Specifies service dependencies for the “app” service.- db: Indicates that the “app” service depends on the “db” service being up and running
Step 5: Create a file named Dockerfile in your project directory.
FROM ruby:3.1.2

RUN apt-get update && \
    apt-get install -yqq --no-install-recommends \
    postgresql-client \
    nodejs && \
    apt-get clean && \
    rm -rf /var/lib/apt/lists/*
WORKDIR /usr/src/app
COPY Gemfile* ./
RUN bundle install
COPY . .
ENTRYPOINT ["/bin/sh", "-c"]
CMD ["bundle exec rails s -b 0.0.0.0 -p $SERVER_PORT"]
A Dockerfile is a text-based script used to define the configuration and steps required to build a Docker image. It outlines the base image, installation of dependencies, copying application code, setting up the environment, and specifying the default command to run when a container is created from the image.
FROM ruby:3.1.2: Specifies the base image as Ruby version 3.1.2 for building the Docker image.RUN apt-get update && \: Updates package information and starts a command chain.apt-get install -yqq --no-install-recommends \: Installs packages (-yqqsuppresses output,--no-install-recommendsskips recommended packages).postgresql-client \: Installs PostgreSQL client tools.nodejs && \: Installs Node.js and continues the command chain.apt-get clean && \: Cleans up package cache.rm -rf /var/lib/apt/lists/*: Removes cached package lists.WORKDIR /usr/src/app: Sets the working directory inside the container to/usr/src/app.COPY Gemfile* ./: Copies Gemfile and Gemfile.lock to the working directory.RUN bundle install: Runsbundle installto install Ruby gems specified in the Gemfile.COPY . .: Copies the entire application code to the working directory.ENTRYPOINT ["/bin/sh", "-c"]: Sets the entry point and starts a command chain.CMD ["bundle exec rails s -b 0.0.0.0 -p $SERVER_PORT"]: Specifies the default command to run when the container starts, launching the Rails server with the specified options.
Step 6: Create a file named .env in your project directory.
POSTGRES_HOST=db
POSTGRES_USER=rent_car_user
POSTGRES_PASSWORD=something_secure
S3_BUCKET_NAME=s3_bucket_name
SECRET_KEY_BASE=key
SERVER_PORT=3000
PIDFILE=/dev/null
Step 7: Run the docker-compose build command.
docker-compose build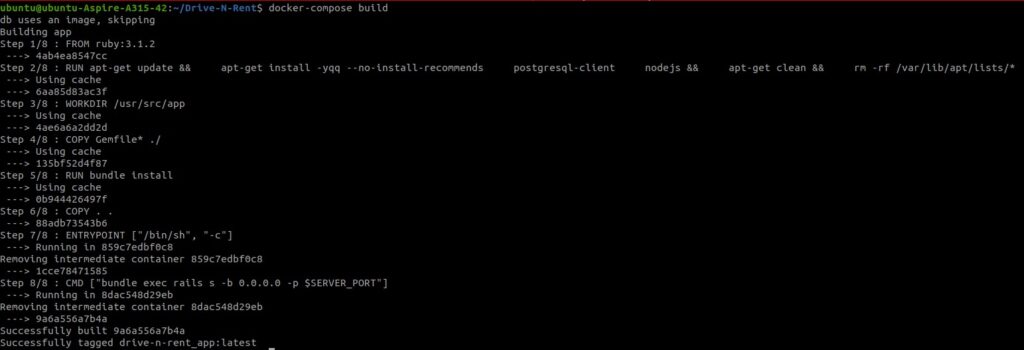
The docker-compose build command is used to build Docker images based on the configurations specified in your docker-compose.yml file. When you run this command, Docker Compose looks at the services defined in your docker-compose.yml, checks their build configurations, and then builds the necessary images according to those configurations.
Step 7: Run the docker-compose up command.
docker-compose up
If you want to start the services and container to run silently in the background, then use
docker-compose up -d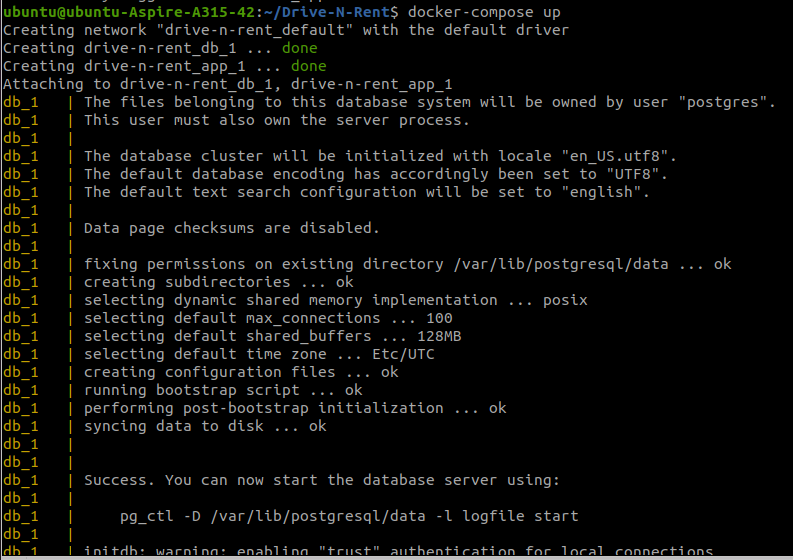
docker-compose up simplifies the process of deploying and managing complex multi-container applications. It’s a convenient way to start, orchestrate, and monitor your containers as a cohesive application stack, making development, testing, and deployment more efficient and consistent.
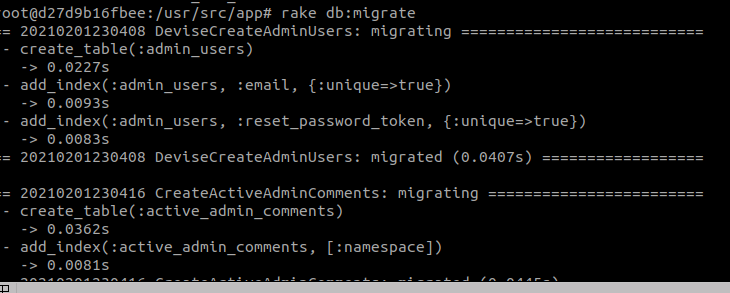
Step 8: Create a database and run migrations
docker-compose exec app bash
rake db:create
rake db:migrate
Step 9: Access the rails application at http://localhost:3000/
TIPS AND TRICKS
if you have an issue using binding.pry in a Rails console running inside a Docker container, then consider using the remote-pry gem as an alternative to binding.pry
Install the Gem:
Start by adding the remote-pry gem to your Gemfile:
gem 'remote-pry'Run bundle install to install the gem.
Add a Breakpoint:
Wherever you want to set a breakpoint in your code, replace the traditional binding.pry statement with:
binding.remote_pryThen run remote-pry inside the bash console:
docker-compose exec app bash
pry-remote


